RAID (Redundant Array of Independent Disks) is a technology that improves data reliability and performance by combining multiple hard drives into a logical unit. Depending on the dependency of the RAID array, the RAID configuration can be broadly divided into the following types:
This is where the RAID is configured by the system's firmware (usually BIOS or UEFI) before the operating system is loaded. The specific steps are:
BIOS/UEFI configuration: Enter the BIOS or UEFI settings at boot time, select the RAID controller option and configure the RAID array.
Create a RAID array: Create a RAID array in the BIOS or UEFI, select the drives to be added to the array and the RAID level (such as RAID 0, RAID 1, RAID 5, etc.).
Install the operating system: Install the operating system on the already configured RAID array. During the installation process, the operating system will recognise the RAID array as a single storage device.
The advantage of this method is that the RAID is independent of the operating system and driver, as the RAID is configured and managed in the underlying hardware. Even if the operating system is replaced, the RAID configuration will still exist.
In this method, the operating system itself manages the RAID array through software at runtime. The specific steps are:
The operating system runs in AHCI mode: The operating system runs the hard disk controller in standard Advanced Host Controller Interface (AHCI) mode.
RAID software installed: Install RAID management software or drivers in the operating system (usually provided by the hard disk controller or motherboard manufacturer).
Create a RAID array: Create a RAID array in the operating system using RAID software. Select a spare SATA drive and configure the RAID level.
The advantage of this method is that it is flexible and does not require complex configuration in the BIOS, but the disadvantage is that RAID performance and stability may depend on operating system management.
This method is similar to the second, but the RAID array is treated as a normal storage device by the operating system. The specific steps are:
The operating system runs in AHCI mode: The operating system runs the hard disk controller in standard AHCI mode.
Create a RAID array: Use specific RAID management tools (such as the built-in disk space utility in Windows or the mdadm tool in Linux) in the operating system to create a RAID array.
Identify the storage devices: The operating system treats the RAID array as a single storage device and performs read and write operations on it as if it were a normal hard drive.
The advantage of this method is its simplicity and ease of configuration, especially when migrating between different operating systems; the RAID configuration can remain consistent, but its performance and reliability may not be as good as hardware RAID.
In summary, the choice of RAID configuration method depends on the needs of the specific application scenario, hardware support, and performance and reliability requirements. Hardware RAID generally offers higher performance and reliability, while software RAID offers greater flexibility and ease of use. In actual applications, a sensible choice of RAID configuration method can improve the overall performance and data protection capabilities of the system.
Here are the steps to create a RAID using the first method on the BIOS interface, which is applicable to chipsets such as the C612/X99:

Requirements:
Number of hard drives: At least 2 hard drives must be installed, otherwise the RAID function will not work.
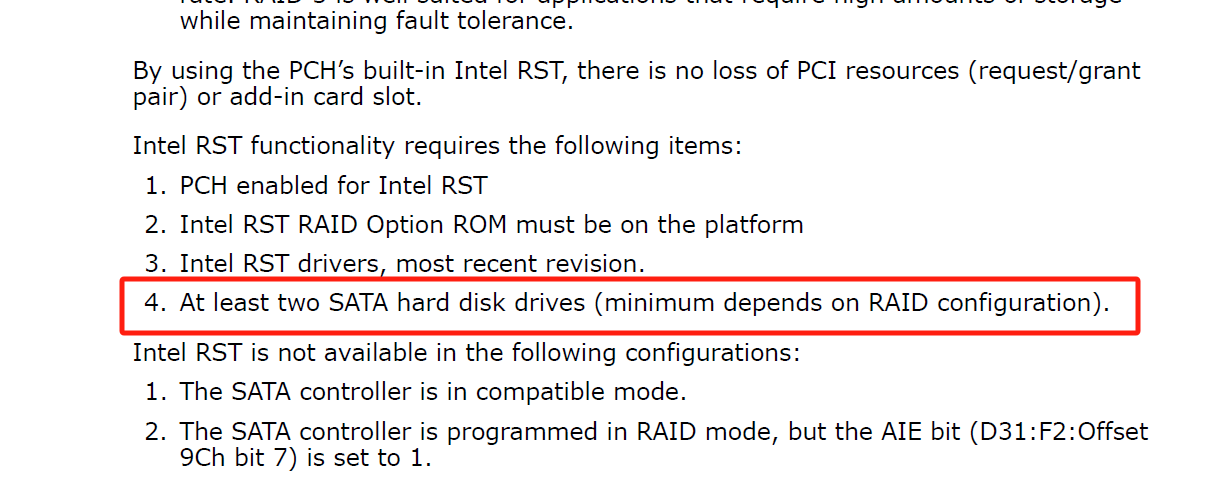
RAID type requirements:
RAID 10 and RAID 5: At least 4 hard drives must be installed. If there are less than 4 hard drives, these two options will not be displayed.
SATA controller description:
There are two SATA controllers on the current motherboard, SATA and sSATA.
The SATA controller controls 6 SATA interfaces that support RAID.
The corresponding positions on the motherboard are shown in the figure:
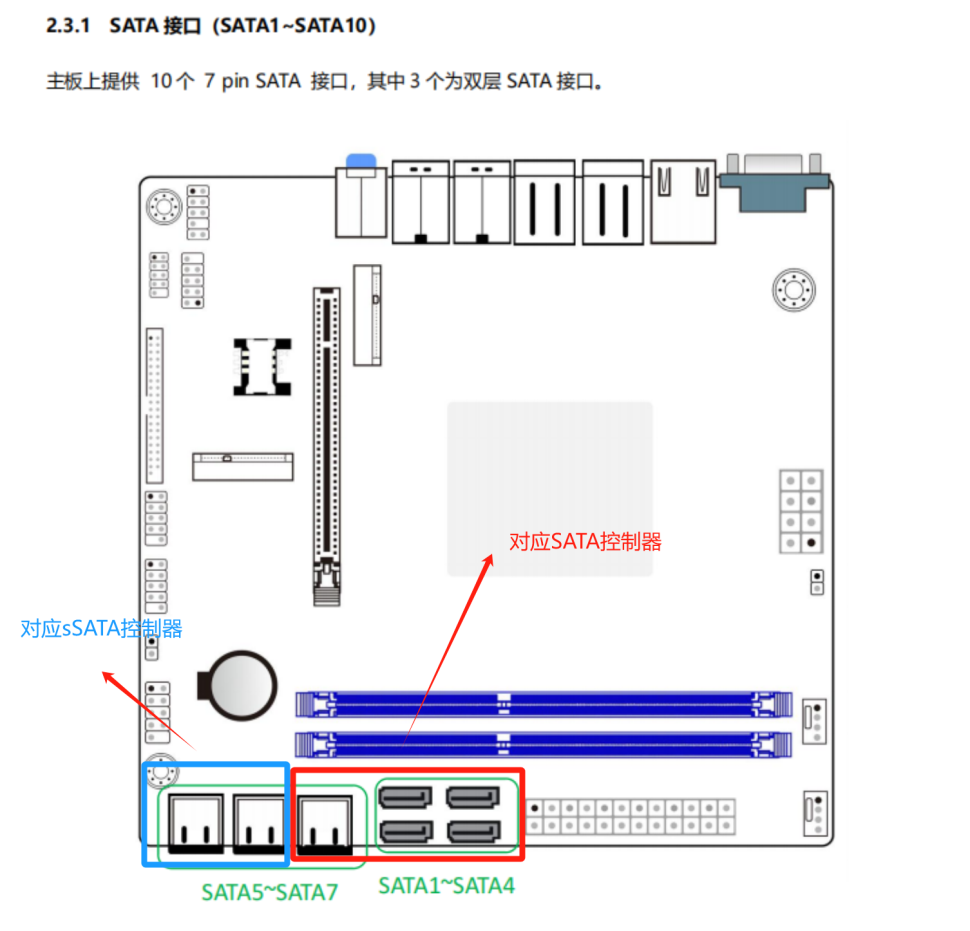
The sSATA controller controls 4 SATA interfaces that do not support RAID. Please refer to the Intel document for confirmation.
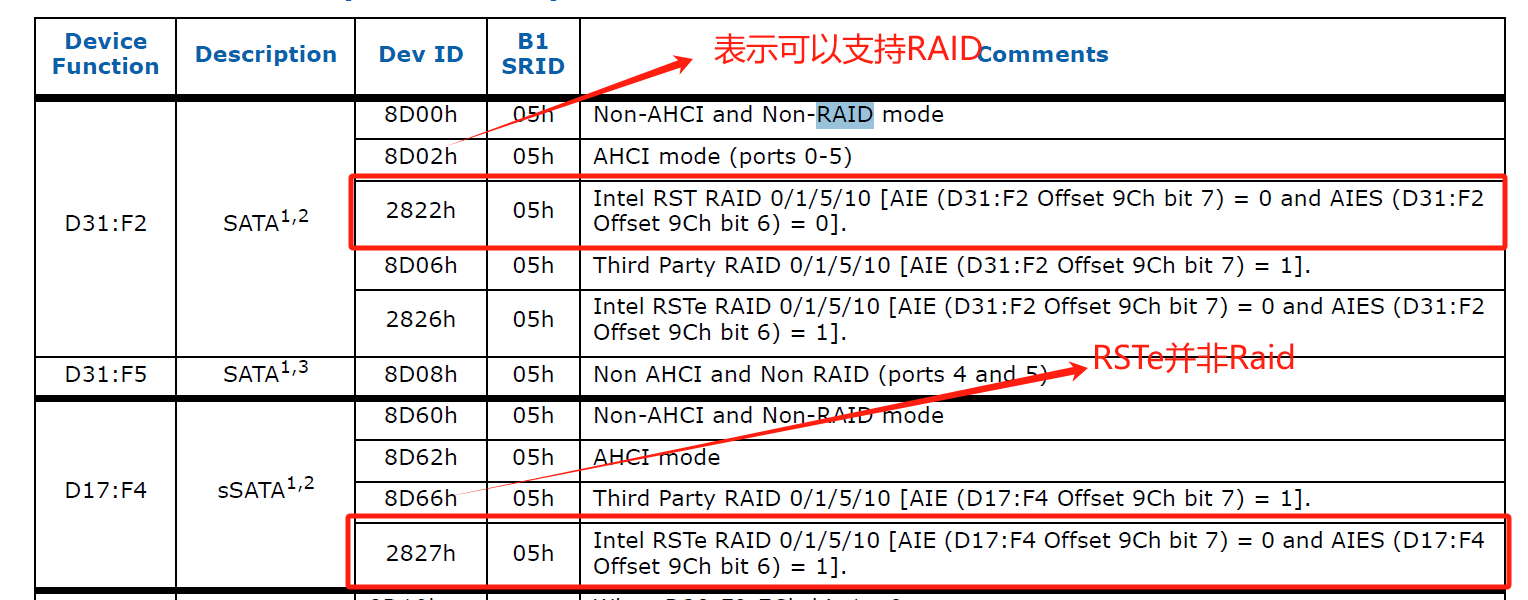
RSTe description:
RSTe (Intel Rapid Storage Technology enterprise) is not RAID. Its full name is Intel Rapid Recovery Technology support. This technology is outside the scope of technical support in this document, and interested users can learn about it for themselves.
During boot-up, press the "Delete" key to enter the BIOS setup interface.
Navigate to the "IntelRC Setup" -> "PCH Configuration" -> "PCH SATA Configuration" page. Set the 'Configure SATA as' option to 'RAID'.
Be careful not to go to the IntelRC Setup -> PCH Configuration -> PCH sSATA Configuration page as the sSATA interface does not support RAID).
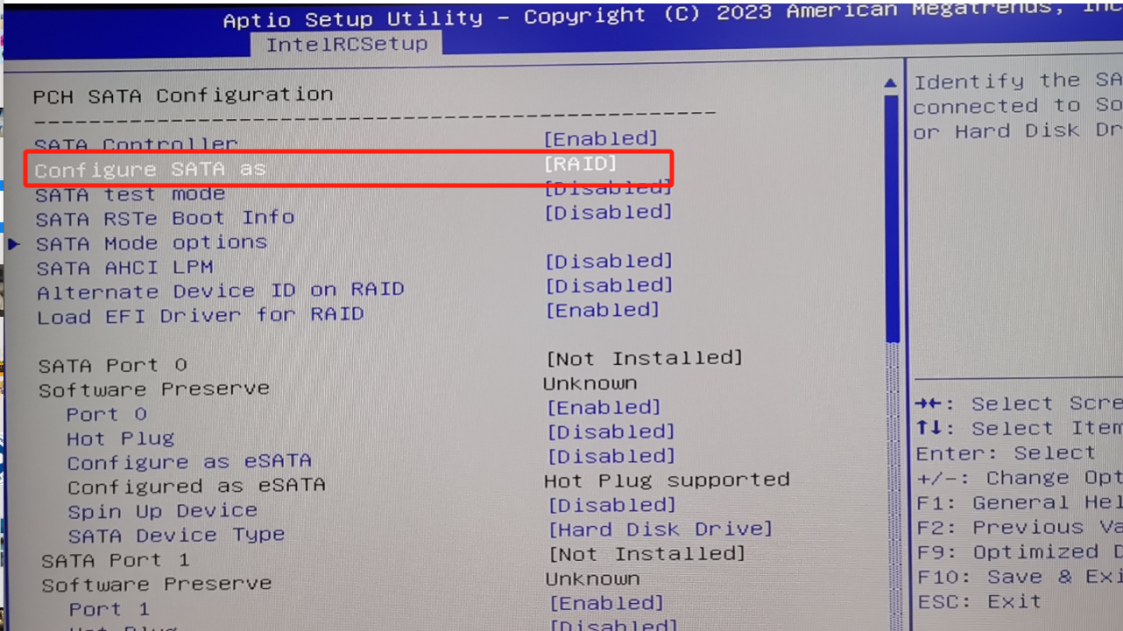
The 'Load EFI Driver for RAID' option has no effect in this step and its setting value can be ignored.
Navigate to the 'Advanced' -> 'CSM Configuration' page.
Set the 'Storage' option to 'UEFI'. (This step will ensure that the system uses UEFI mode to support RAID configuration, which applies to UEFI-booted operating systems such as Windows 8/10).
Press "F10" to save the settings and restart the computer.
After rebooting, re-enter the BIOS setup interface.
Use the left and right keys to move to the 'Advanced' interface.
Locate and select the Intel Rapid Storage Technology option and press Enter to enter.
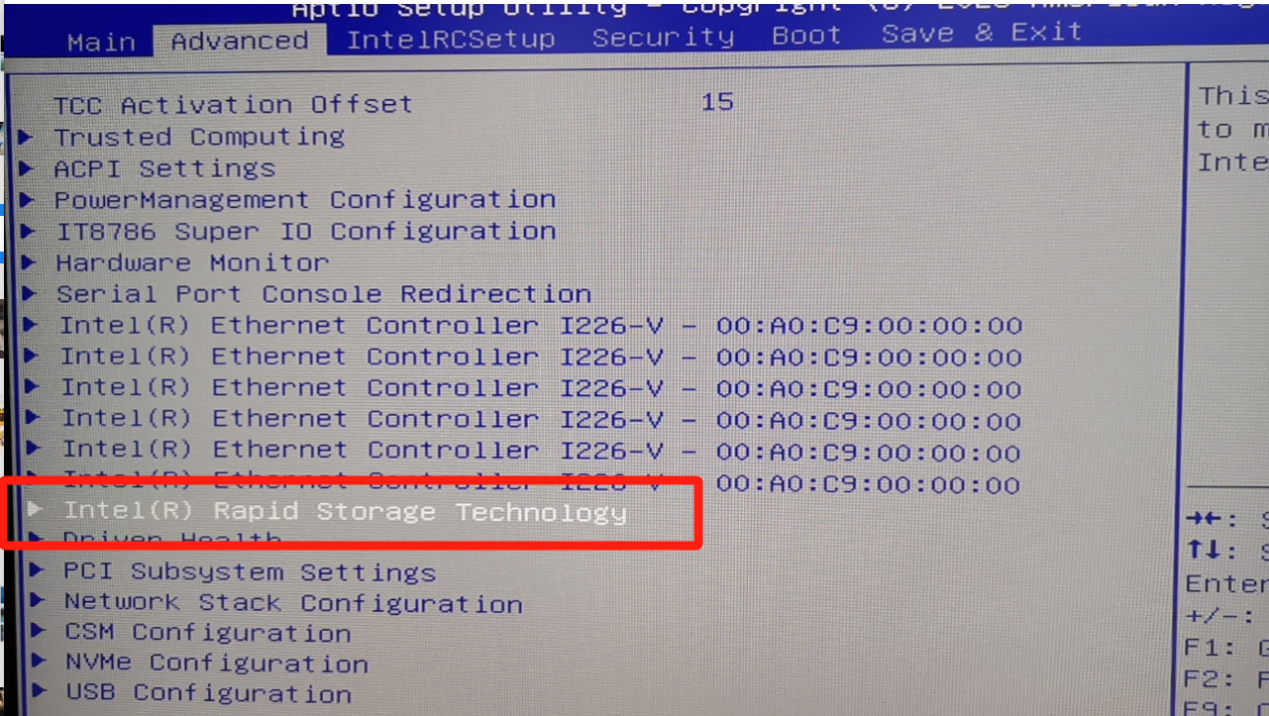
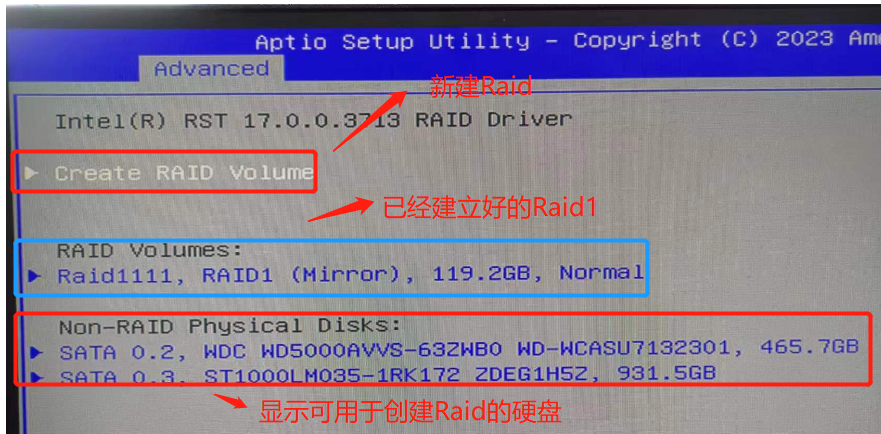
The RAID BIOS driver is divided into two modes:
Legacy OptionROM: used for compatibility with traditional Windows XP and Windows 7 systems. In this mode, you must press "CTRL + I" in the POST interface to enter the RAID configuration interface.
UEFI Raid Driver: used for compatible Windows 8/10 systems in UEFI mode. This mode allows you to work directly in the BIOS interface, also known as UI Raid.
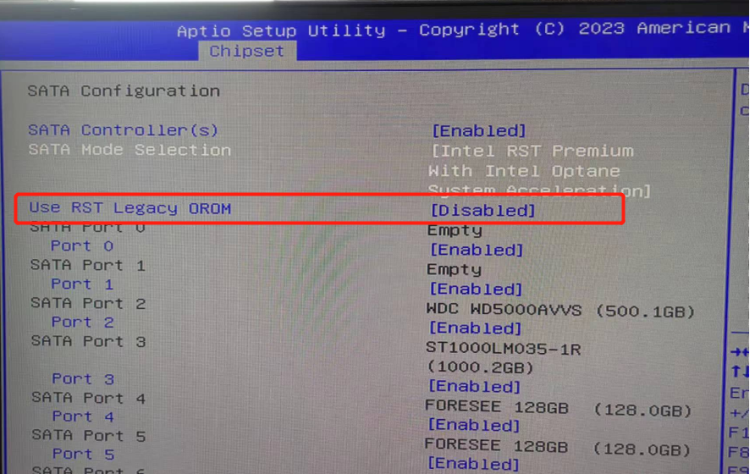
To switch between the two modes, go to 'Advanced' -> 'CSM Configuration' -> 'Storage'.
Setting it to 'Legacy' means that the legacy OptionROM mode is used. Setting it to 'UEFI' will use the UEFI Raid Driver mode.
By default, the system uses the Legacy OptionROM mode.
Select the 'Create RAID Volume' option.
Enter a name for the RAID volume.
Select the RAID level (e.g. RAID 0, RAID 1, RAID 5, RAID 10, etc.).
Select the drives to be added to the RAID array (only drives with SATA interfaces controlled by SATA controllers can be selected).
Set the stripe size.
Confirm the RAID array configuration and finish the creation.
Restart the computer and insert the operating system installation media (e.g. USB disk or CD).
During the OS installation process, the system will recognise the RAID array as a single storage device.
Install the OS on the RAID array.
By following the steps above, you can create a RAID array based on the hardware level in the BIOS interface and select the appropriate RAID drive mode as required. Please note that you must use a hard drive with a SATA interface that is controlled by a SATA controller, otherwise the RAID function will not be effective. RAID 10 and RAID 5 require a minimum of 4 hard drives. If there are not enough hard drives, these options will not be displayed. Once the setup is complete, you can enjoy the data redundancy and performance improvement that RAID provides.
If you have any questions during the configuration process, please contact BKHD FAE for professional technical support and guidance.
Author: Brian Zhang
Date: 2023-11-27
Contact: Kelly
Phone: 18659912363
Tel: 13636923655
Email: info@bkipc.com
Add: 3rd Floor, Building 2, Meilan IND, Longhua District, Shenzhen, Guangdong, China, 518109